


関連商品:
 | Fantasy making : Hirst Arts mold #370 ( Castle Cube Bases ) |
 | Fantasy making : Hirst Arts mold #371 ( Castle Cube Tops ) |
 | Fantasy making : Hirst Arts mold #372 ( Castle Cube Wall ) |
 To build the project shown here you will need 10 castings of mold #370 castle cube base, 10 castings of mold #371 castle cube top and 10 castings of mold #372 castle cube wall mold.
These also work nicely as a shelf display which you can set your miniatures in front of.
Castle Cube Scale and Uses
An introduction to castle cubes.
Click on the video on the right to watch it.
This video shows the molds used for the dungeon master screen, demonstrates the scale of the blocks and also provides strategies on how to build with the blocks.
Click on the video

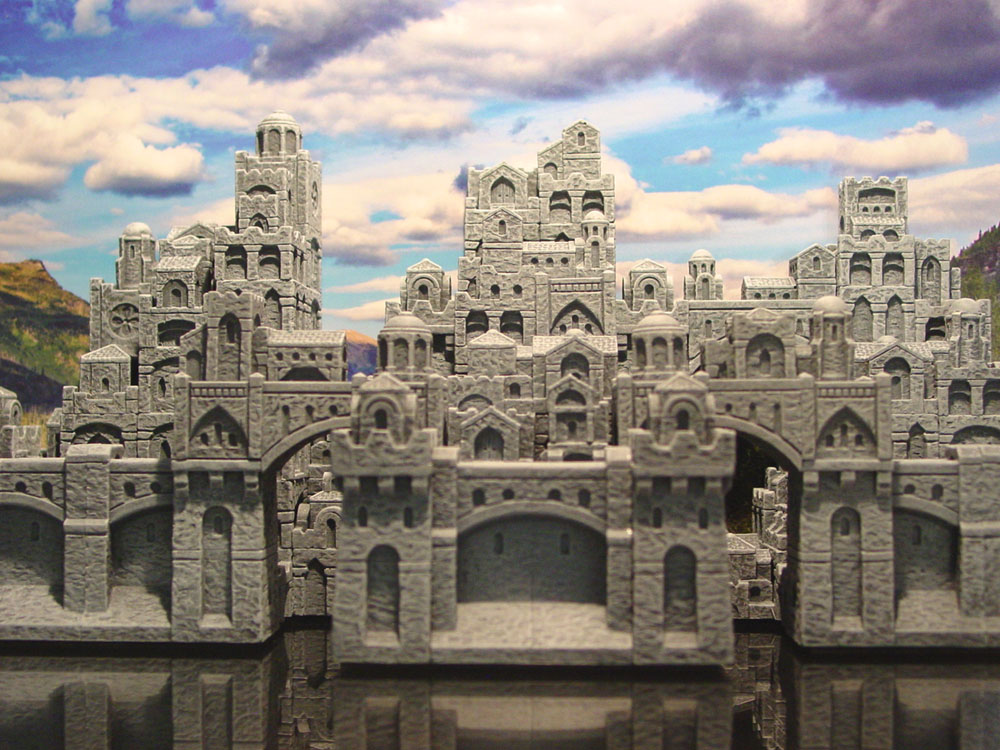
 These buildings are 1:285 scale also known as 6mm scale. These can be used for games such as Battletech, Warmaster, CAV, Star Wars and many other small scale games.
Below are some examples of how the miniature sizes compare to the buildings.
 Mold #372 has two different towers. It has a straight tower and a corner tower.
These towers are assembled by gluing the tops to the bottoms. They have pegs and holes so you can't get them mixed up.
Mold #372 has two different towers. It has a straight tower and a corner tower.
These towers are assembled by gluing the tops to the bottoms. They have pegs and holes so you can't get them mixed up.
 After you assemble the towers, you can see the difference between the two.
The straight tower has overhangs on opposite sides and the corner tower has overhangs on two sides next to each other.
The wall blocks are all the same. Just put two of these together to make a wall section.
 On the instructions below, the letters T, S and C will mean the following blocks shown in the photo.
When building walls, the corner towers have two flat interior sides so the walls will have something flat to glue on to.
All of these blocks have a footprint size of 3/4" square so you can incorporate these walls into your castle cube buildings made using molds #370 and #371.
Sculpting in plastic.
Click on the video on the right to watch it.
If you are interested, I shot a video of how these castle towers and walls were sculpted from scratch.
Click on the video

Building Tips
To build the project shown here you will need 10 castings of mold #370 castle cube base, 10 castings of mold #371 castle cube top and 10 castings of mold #372 castle cube wall mold.
You will need at least 15 pounds of dental stone to complete this project.
Castle cube building tips.
Click on the video on the right to watch it.
This video describes the finished size of the dungeon master screen and also gives tips for gluing the blocks together.
Click on the video

 Before gluing your wall blocks, check the back side of them to see if they are concave. If you can see an edge around them, lightly sand them so you have a better surface to glue to.
While painting this castle, there were two places where my model came apart. Both places were where the castle wall surface was glued against a tower side.
I had no problem gluing the bottoms of the other blocks down when stacking them so I think these are the only blocks you need to worry about sanding.
 When gluing the sides of cubes together, pay special attention to where these blocks will actually touch.
In this photo, the only places these blocks will touch will be around the outside arch, so be sure to apply a liberal amount of glue there.
 For this case, these two blocks have very few places they actually touch.
Be sure to apply glue to where they touch.
 These two blocks are a problem. This can be solved by adding a building which will be glued on the bottom and the side.
 You can make a really helpful guide out of Legos.
Here, I stacked up a bunch of plain Legos and made a large 90 degree corner. You can place your blocks against this wall after you glue them to get the sides to line up straight and the corners to be at right angles.
Building Instructions
To build the project shown here you will need 10 castings of mold #370 castle cube base, 10 castings of mold #371 castle cube top and 10 castings of mold #372 castle cube wall mold.
You will need at least 15 pounds of dental stone to complete this project.
To follow these instructions you will need to print out this pdf file.
Just click on the photo on the right and print this out on your printer. This guide has assigned each decorative top block from mold #371 a number so you can easily see which block is needed in the instructions below.
click here

 The photo below describes how the pieces from each mold will be identified.
Cube blocks from mold #370 will not be labeled.
Decorative top buildings from mold #371 will be identified by their number, which can be found on the pdf guide above.
Tall wall blocks from mold #372 will not be labeled. Towers and tops from mold #372 will be labeled with a letter.
Section A
 The photo on the right shows the first section we will be building. This section is made from five different groups we will glue together.
 |
 |
 |
 |
 |
 |
 |
 |
 |
Section B
 The photo on the right shows the second section we will be building. This section is made from six different groups we will glue together.
 |
 |
 |
 |
 The castle wall may slightly overhang on the right side of the B2 piece. This will not cause a problem when you put together the display. The castle wall may slightly overhang on the right side of the B2 piece. This will not cause a problem when you put together the display.The reason this will happen is that all of the castle cubes are intentionally made slightly smaller (10/1000") because they were originally meant to be used for a castle cube stacking game. In this game, small groups of cubes would be grouped and painted. Since paint takes up thickness on all sides of the cube, they would have been too tight to stack and remove when planning these cubes with other Hirst terrain. Also, I thought it unlikely these cubes would be stacked in lines covering long distances. However, the castle walls and towers are meant to be stacked in lines to cover long distances so they are more precise in size, therefore slightly longer than the cubes when lined up. This difference in size will not affect the display. The wall that extends out will simply meet up with a side tower and the small gap will be hidden down beneath the structure when the whole thing is assembled. |
 |
 |
 |
 |
 Section B3 is made by gluing the top and the bottom sections together. Section B3 is made by gluing the top and the bottom sections together.These needed to be made is separate sections to make it easier when assembling the bridge. |
 |
 |
 |
 |
Section C
 The photo on the right shows the second section we will be building. This section is made from nine different groups we will glue together.
 |
 A straight tower is used on this corner. A straight tower is used on this corner.Because of this a gap will appear between the tower and the wall. Be sure to glue it well at the top and bottom. |
 On section C5, be sure that the overhanging corner is facing away from you like the photo shows. On section C5, be sure that the overhanging corner is facing away from you like the photo shows.A wall end will end up gluing flat against the tower side you see here later on. |
 This section is a mirror image of section C3 (above). This section is a mirror image of section C3 (above).All straight towers are used so you will end up with a gap between the right wall and center tower. Be sure to glue this joint well at the top and bottom edges. |
 |
 |
 |
 |
 |
 This section has a small bridge that sticks out the side. This section has a small bridge that sticks out the side.Be sure to align this bridge to the tower top next to it. When gluing this in place, it is best to lay the tower on its back until the glue dries. |
 |
 |
 |
Painting and Assembly
Painting the Sections
Click on the video

 The colors used and the exact painting method is detailed on the Painting Instructions page.
Here I am applying the Castle dark gray color of paint. This paint is fairly thin so it will get down into all the cracks. Wearing a glove on the hand holding the piece is helpful.
I also paint the piece while holding it over the paint container when possible. That way the drips go back into the container instead of all over the table.
The brush I am using here is a 3/4" wide trim brush which you can find at most hardware stores in the paint department. It has nice long bristles which can get down between the buildings really well.
 After the piece is drenched, you will need to remove the excess paint from it.
Hold your paint container with your left hand and scrape your brush against the edge to get rid of the excess paint in the brush.
Then jam the brush down in between the towers and anywhere you see puddles of paint collecting.
Continue to scrape off the excess from the brush and dab up the drips until you get a fairly thin coat of paint over the whole piece.
 After the piece is dry, check for missed spots.
You would think that after drenching the piece in paint there would be not unpainted spots remaining. However, many times air pockets will form in the windows and crevices resulting in unpainted spots.
Be sure to check all of the pieces from every angle and use a small brush to get any spots that were missed.
 Next I am applying the Castle medium gray color of paint. This color is dry brushed on with a medium pressure.
The exact painting method is detailed on the Painting Instructions page.
Afterwards, the light gray is dry brushed on very lightly to pick up the highlights.
Assembling the Sections
Click on the video


|

|

|
 To keep the castles from scratching up the table, I'm going to add some self-adhesive neoprene rubber to the bottoms.
This rubber is about 1/16" thick and comes in a roll that is 12" wide. I purchased it on Amazon.
I'll start by placing the castle on the wax paper side and draw around the castle.
 Cut inside the line about 1/8" or even a little more. It's better to have the rubber a little too short than to have it sticking out around the outside.
Peel off the wax paper and stick it to the bottom of the castle sections.
 For the back of the dungeon master screens, I'm going to use some 9" x 12" plaque blanks. I found these at my local trophy store for about $5.00 each.
For the color design in the background, I'm going to use printed calendars. These calendars measure 12" square which will be a perfect size for the plaques.
Calendars also work nice because they are printed on thick paper which also has a printed varnish on it. Calendars are meant to hold up to handling and page flipping.
I'm also going to use double sided permanent tape to stick the calendars to the plaque blanks.
 Before we continue, you might consider what the screens would look like with no photo in the background. Many times a trophy store will also offer laser engraving where they can burn a design into the plaque, or even place an engraved brass plate above the castles.
 Before we stick down the calendar pages, be sure to trim them down to fit the plaque. It's ok if they are a little short. Having about 1/8" of plaque showing around the outside will help you trim the tape off later on.
Next I will apply the double sided tape to the back side of the plaque. By putting the tape on the back side, the calendar will cover up the keyways cut into the back of the plaque which are used to hang the plaque up.
Place strips of tape beyond the edges of the plaque all the way around. I left about 1/8" gap between pieces of tape and it worked just fine.
 Very carefully position the calendar onto the plaque. I started by sticking down the tiny edge of one corner and then tried to get one side aligned. Be sure to test fit the paper on the plaque first to get an idea of how much brown will show around the outside of the calendar.
Then use a sharp knife and carefully follow around the edge of the paper to cut the excess tape off.
 Once the picture is stuck down, apply glue to the back of the castle.
Be sure that the glue is applied to the raised portions of the castle back. I tried to keep excess glue away from the edges of the castle where it might squeeze out and be seen on the calendar.
Then, center your castle against the plaque and press it into place.
Finished Photos

|

|
|

|

|

|